


Specifications
Clamp On Ultrasonic Flow Meter Specifications
- Transducer material: Aluminum and 304 SS
- Medium: Any acoustically conductive liquid with less than 5% air bubbles or solids
- Flow Range: Supports velocities up to 40 f/s or 12 m/s
- Accuracy: ±1% from 0.15 to 40 f/s (0.05 to 12 m/s)
- Resolution: 0.01 ft/s (0.00025 m/s)
- Response time: 150 ms measuring cycle typical
- Pipe Size:
- 0.6” to 228”
- Smallest pipe/tube:(1.125 OD with .05 wall with N or W Mounting)
- Temperature: - 20 - 110 ℃
- Cable length: 15’
- Transducer Frequency: 1 MHz
- Clamp-on transducers: encapsulated design IP68
- Std Temp Spec for Blue Transmitters 194 F (90 C)
- Std Temp Spec for Black Transmitters 320 F (160 C)
- Enclosure Grade: IP65
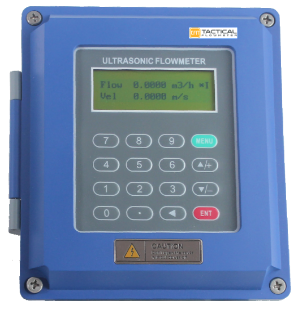
- Display LCD Screen
- Power Supply: Set up to use either 24VDC or a 86-240 VAC Universal Power Supply. Only one at a time. Consumes 500 mA max
- Output: 4-20mA + 0-10K Hz + Standard ModBus RTU Communication protocol
- Note: For 1 to 5 VDC output, add 250 Ohm resistor to 4 to 20 mA loop
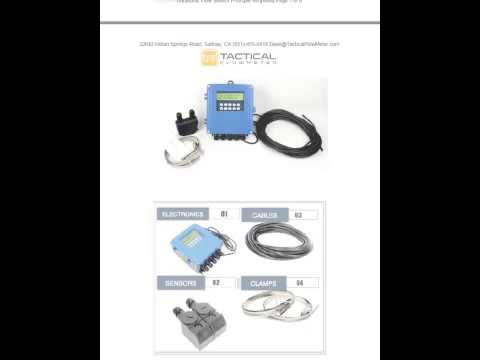
Product Line
MAG Meter Complimentary Product line

Instructions
TFM Clamp-On Ultrasonic Manual v2
TFM Clamp-on Ultrasonic Manual v1
Where to get Power Supplies, Gaskets, Nuts and Bolts Link
Plumbing
Ultrasonic Meter Transducer Installation requirements: On this flow meter, as well as of all flow meters, it is CRITICAL that the pipe remains full at all times. This meter requires that the flow remain relatively consistent. Note 10 diameters clear of obstruction upstream and 5 diameters down. As well, it is important to ensure the LCD Display is not out in the Direct Sun, provide a shade cover for the LCD so that it will retain the high contrast required for viewing the values.


Theory
PDF of How Ultrasonic Flow Meters Work
Remote Totalizer
How to Connect a RedLion CUB5R000 for Remote totalizing.
Installation
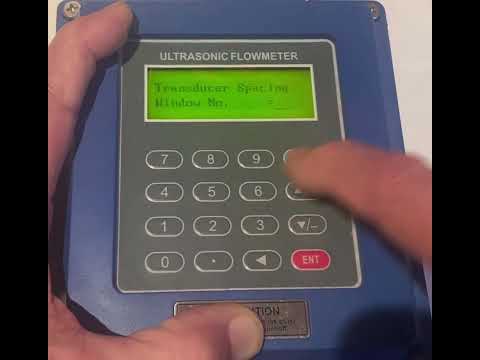
How to Install Ultrasonic Clamp On Transducers
Clamping system for pipes larger than 10" OD. Install by securing ends with clamps WITHOUT the transmitter and then stretch the nylon coated SS wire over the transmitter. BE SURE to grind a CLEAN area for the transmitter to conduct the sound AND use the Acoustic Coupling Grease on the transmitter/pipe interface.
Note how strap is used.

Acoustic Grease
ACOUSTIC COUPLING GREASE SPECIFICATIONS:
Dow Corning Product Name: MOLYKOTE™ BR-2 Plus High Performance Grease
This material is designed to remain in a gel like form to increase the acoustic coupling of the ultrasonic transducers to the pipe. This material works from -57 to 204 Degrees C which is above the specs of the transducers.
Here is a source to buy it: MSC # 31735293
In a "pinch" one could use KY Jelly from the drug store but it is runny. The goal is to have a material that will not have bubbles in it and provides good sonic coupling. Air bubbles are the "enemy" of ultrasonic transducers. Using traditional Silicone sealant, such as that used for sealing windows, could also be used in an emergency but you MUST assure there are no air bubbles.
Sound Speed
Sound speed of various materials:
Note: For Fluids that are NOT already Pre Programmed into the Ultrasonic meter you will want to enter in the Sound Speed and Viscosity at the temperature of 20 Degrees C as this is the REFERENCE condition used for the math in the flow meter.
Important notes on the use of Clamp On Meters of all brands:
While it is compelling to utilize these meters because of their ease of installation it is critical that the pipe material, thickness and ID are well known. Many times older pipes can have significant corrosion reducing the inner diameter to such a level that the sonic energy can not penetrate. Frequently banging on the pipe with a double jack can remedy and remove large "mushroom like" growths it can not remove long term built up scale that tends to absorb energy. Banging on some piping systems is NOT an option because it can break or cause a leak. We can not guarantee that a Clamp On Meter is ideal for the installation if the internal condition of the pipe is unknown. We will be happy to provide consultation to give ideas on how to measure flows in such conditions but can not be held to task should the internals of the pipe not be verifiable. Generally we will not refund the purchase price on a system where the pipe condition is difficult to obtain.
Cheat Sheet
Quick Ultrasonic Instruction Manual, Style 2 Ultrasonic Installing Cheat Sheet, Style 2

Videos
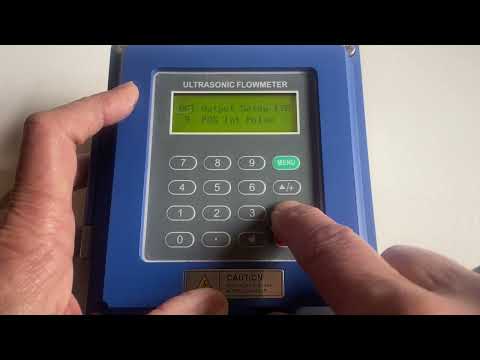
HELPFUL QUICK NOTES: Menu 90 shows Signal Strength and Menu 00 shows main flow rate and total. Frequently, fine tuning may be had by invoking Menu 90 and making small movements of one of the transducers to get the highest signal. Numbers over 80% are considered very good. Also set menu 40, the Filter Coefficient, (We could call this the time constant or response time), with Menu 40 to 1 second to make the meter respond quickly. Then, put back to 4 seconds and save with Menu 26 and hit enter twice. Menu 45 is for entering a K-Factor, this would be handy if you KNOW the flow is 90 when it says 100. In this case a K-Factor of 0.9 would remedy it. (Ideally the distances and pipe thickness/material would be corrected but this is easier). Menu 70 and 71 allow LCD Display on time and contrast respectively. Note for Password Menu 47 System Lock unlock code is 8758
PASSWORD = 8758
K-Factor
There is a Scale or K-Factor at Menu 45 that you may wish to invoke if you know a flow to be 1.10 units and we say is is 1.00 units then you can adjust Menu 45 to 1.1 to have the meter agree with a standard you believe to be true and correct. After setting this value invoke Menu 25 with two Enter hits and then get back to the main menu with menu 00. Note: The Scale, or K-Factor can go from 0.5 to 1.5.
Energy Meter BTU Meter notes
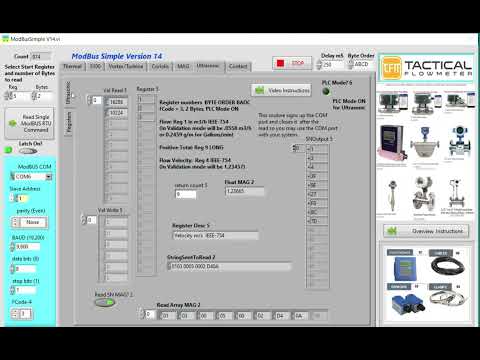
Use ModBus RTU to read register 121 (Positive energy accumulator for billing) as an IEEE-754 float in ABCD Byte order for the energy value in GJ (Giga Joules)
Note:947,817 BTU = 1 Gj
Select Menu 5 to view Energy values, Menu 6 shows Delta T.
Select Menu 84 to configure Energy Meter settings.
Reset totalizers with Menu 37
§3.1.6 Validating meter function.
Entering a pipe outer diameter (Menu 11) of zero, results in the display to show the flow velocity: 1.2345678m/s (4.0504ft/s) [use down arrow to view], flow rate= will vary, and display “R”status on Menu 00. Inputting a set value in M44 will change the flow rate output. Use this function to test of the flow meter and network software without having to connect the transducers. If they are connected the flow rate may be + or -
Note: Menu 44 allows setting up a ZERO value so that you can simulate flow. Entering a - (negative) value allows the flow to indicate positive. Be sure to put Menu 44 back to 0 when done simulating.
Simple Overview how Ultrasonic Flow Meters Work. See the PDF below as well.
PDF of How Ultrasonic Flow Meters Work
Super Simple example for parsing data from ModBus showing a fixed value and a changing value.
Ultrasonic Meter setup verification and overview of menus for DOSING or METERING functions. The video below called "Video showing How to connect 4-20 mA on the Ultrasonic Flow Meter" shows more details about pipe type and fluid selection in the 4-20 mA. Please watch this quick video and do not forget about Menu 26.
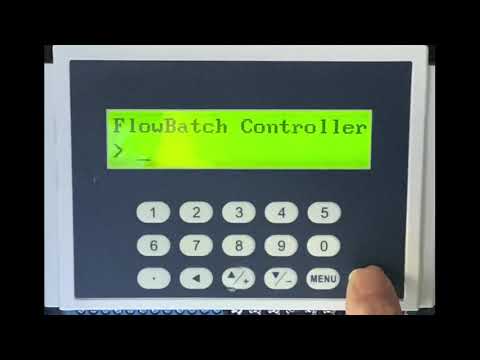
How to make a Batch Controller with an Ultrasonic Flow Meter:
Note: Menu 78 allows you to select the OCT (Open Collector Transistor) and/or the Relay Output contact closure at pins 30 and 31 under menu 79 RELAY Output Setup. Use Selection 8. Batch Controller Then, ensure Batch Trigger Select is on 0. Key Pressing. CYcle through Menu 78 to see OCT Output [78 indicate 8. Batch controller, then hit the down arrow to confirm Relay Output Setup 8. Batch Controller then hit the down arrow to confirm Batch Trigger Select set to 8. Key Pressing to duplicate what is shown in the video. Select how many gallons you wish to batch with Menu 81 and if it is already set hit ENT 3 times to start the batch. The batch can also be initiated with the OCT and with ModBus. Remember: Select Menu 26 and hit ENT TWICE after making changes to SAVE your settings.
Video showing How to connect 4-20 mA on the Ultrasonic Flow Meter

How to Factory Reset the Meter Values if you discover unknown variables were changed. Note: Doing so retains the timing calibration elements but reverts to factory values that require selecting the language, units, transducer type, and all the pipe and fluid settings. We show this using Menu 37 twice, once to reset and the next to select the language, and then using Menu 30 to select the units, then 23 for the transducer type, then 70 to have the LCD Backlight stay on 999 seconds, and then on to menu 11 and the associated menus such as 77, we do not show menu 55 and associated menus for the 4-20 output. Remember Menu 26 TWICE to save your changes. Use the Cheat Sheet to configure your meter as required.
How to Linearize the Ultrasonic Flow Meter. Menu 48 and enter password 1111 to start and enter how many points you will use. We show 7 points in this example.
