


2" NPT Modulating Control Ball Valve
Regular price
$0.00
$1,400.00
2" NPT Modulating Control Ball Valve
2" NPT Modulating Control Ball Valve
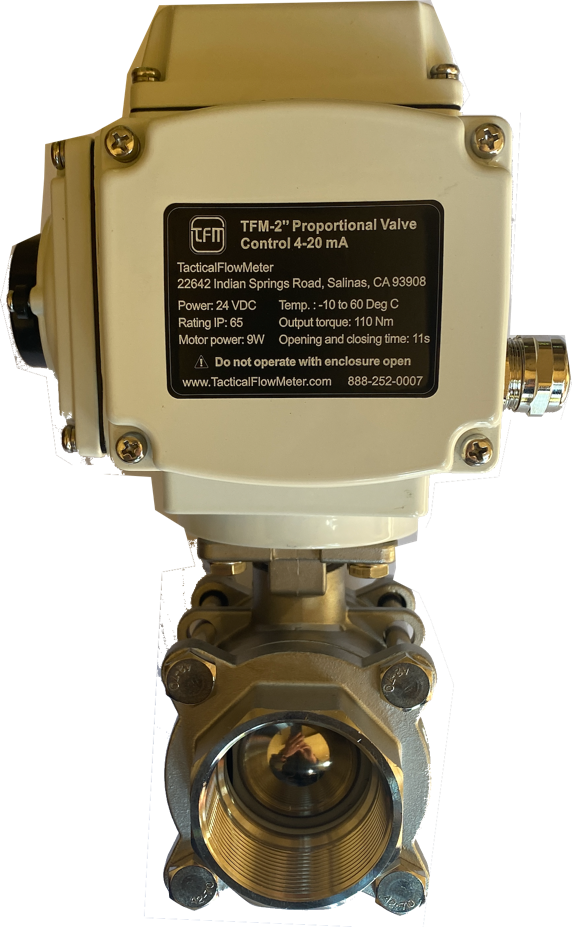
 2” NPT Modulating valve 24 VDC 4-20 mA Control |
 2” FNPT 304 SS Model TFM-2” Modulating Control Valves |
|
Link Click the link, or the video, to see the video of the valve and how to hook up and note response time. |

|
Integrate with a PID controller to use the 4-20 mA Flow Signal and provide a setpoint to the PID Controller to attain the desired setpoint. |


|
2” Size |
2" FNPT |
|
Maximum working pressure |
1.6 MPA, 232 PSIG |
|
Fluid medium |
Fluid, air |
|
Rated voltage |
24 VDC 1 Amp max, 0.6 A running |
|
control signal |
4-20mA for off to full open, Programmable |
|
Wiring control methods |
2 wire control with feedback signal |
|
Open/close time |
≤ 11 Seconds |
|
Valve Body material |
304 SS |
|
Actuator material |
Cast Aluminum and 304 SS |
|
Sealing material |
FKM & PTFE |
|
Actuator rotation |
90° |
|
Torque force |
110 NM |
|
Environment temperature |
-10℃ to 60℃ |
|
Liquid temperature |
2℃ to 90℃ |
|
Manual override |
Yes |
|
Indicator |
Yes |
|
Enclosure Rating |
IP67 |
|
Locked-rotor Current |
3 A |
|
Locked-rotor Delay Time |
2-4s |

Quick User Manual
Simple Troubleshooting...
The Control box blinks -E1-
If the box indicates -E1- it MOST LIKELY means that the 4-20 mA control is NOT CONNECTED, (be sure to seat the Multi Stranded cable securely) and make sure that there is AT LEAST 3 mA. No connection to the 4-20 mA control line will throw this error. Use a FLUKE DVM, set in the Current Mode to MAKE SURE that the 4-20 mA signal does indeed vary from 4 to 20 mA. You do NOT have to cycle the power to clear the error after you connect a proper 4-20 mA Control Signal.
This can ALSO happen if the input power is reversed momentarily. Just connect the DC 24+ to the DC24+ and the 1 to the DC 24 -. Provide at least 850 mA of current.
The valve does not fully close with 4 mA or does not fully open with 20 mA
If a user happens to push the programming buttons incorrectly the controller can go out of calibration. The controller can be easily instructed to self calibrate for 4-20 mA for the 0-100% open position. Use the Automatic Calibration method shown on page 9 of the manual. Be careful with "live processes" because the valve will go from closed to full open and take about 80 seconds to complete. It does not matter what your 4-20 mA command signal is set to at this point. Details here...
Press the A/M and the DOWN button (the two OUTER buttons) AT THE SAME TIME and hold until the display circles around, like a race track, then release (3 seconds or so). The calibration has been initiated when the race track circles around and it takes about 80 seconds to complete the entire process.
If the valve is currently in the closed position it will likely display a number in the range of 28 and "measure" it for a while. If not closed it will drive the valve to the closed position and then then advance to the full open position and likely indicate a number of around 965. After a moment it will tweak the valve to the fully open position and the display will blink 100.0 indicating it is done.
Hit the A/M button to resume normal operation. The valve will go to the position commanded by the 4-20 mA signal. 4 mA (or below) is 0.0% and 12 mA is 50.0% and 20 mA is 100.0%