
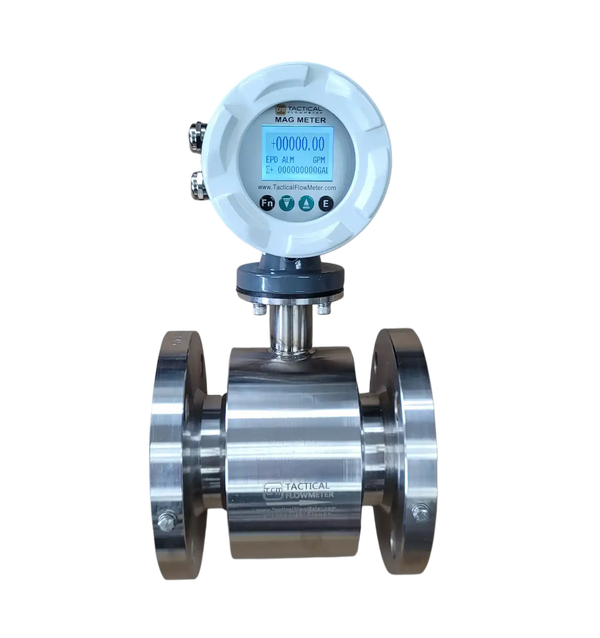


Specifications
Magnetic Flow Meter Specifications
- Electrode Material: 316L SS
- Wetted Materials: Teflon, 304 SS, & 316 SS
- Flow Body Material: 304 SS
- Flow Range: 0.3 - 12 m/s
- Nominal 0.3 - 10 m/s for 0.5% Accuracy
- Accuracy: +/- 0.5% of reading in water (From 0.3 m/s to 10 m/s)
- Repeatability: +/- 0.15% of reading
- Pipe Size:
- Inline: 1/2" to 80" 150# ANSI flange connections, Up to 2500# available custom
- Insertion: 6" to 96"
- Inline: 1/2" to 80" 150# ANSI flange connections, Up to 2500# available custom
- Temperature:
- Liquid: 14°F (-10°C) to 350°F (180°C)
- Ambient: 14°F (-10°C) to 140°F (60°C
- Power Requirement: 24 VDC 20 Watts maximum;
- Output signals: Modbus RTU, 4–20 mA, and 0-10 KHz for flow rate indication
- Digital communications: Modbus RTU
- Proof Pressure: 1.6 MPa, 230 PSIG.
- LCD Display: Flow rate, Flow rate 0-100%, and total flow
- Wiring connection to enclosure size: M20 x 1.5
- Factory Final QC Test Certificate
- Integral Electronics
- Electronics Enclosure: IP65
Product Line
Instructions
Current Version:
TFM MAG Meter v2 ModBus RTU Manual
Older Version:
TFM MAG Meter v1 User Manual
TFM MAG Meter v1 ModBus RTU Manual
Flow Range
The table below gives a guideline of the nominal maximum GPM for various pipe sizes. Flows in well designed piping systems, to minimize wear and noise, and energy, are typically no more than 10 m/s max. Note these meters can easily go to 12 m/s for systems, such as high pressure fire fighting systems and blowdown systems.

Dimensions
Wiring/Plumbing
IMPORTANT NOTE: This meter is not a "Loop Powered" device, unlike almost all temperature and pressure transducers that are loop powered. This meter takes 500 mA to run so you can see that they can not be Loop Powered. It is CRITICAL that 24 VDC is NOT connected to the 4-20 mA signal lines of COM and I+ where COM is connected to the "low" side,-, of the 4-20 mA and the I+ is connected to the "high" side,+. Your PLC has a mode in it to read these meters that does NOT involve sending power to the meter. These meters are SOURCING the 24 VDC. Connecting 24 VDC to the Current Output lines may void warranty.
View video above to see how an INSERTION MAG meter is installed, which is DIFFERENT than the flange meters on this product page. Please visit INSERTION MAG meter product listing if you discover you need an Insertion Mag Meter.
Note: The following display orientations can be ordered so the user does not have to orient in the field.
Retractor
Flowmeter Retractor & Hot Tap Insertion Meter RetractorThe HIGH PRESSURE RETRACTOR works with the INSERTION MAG METER or the INSERTION VORTEX METER. It is smooth as silk and super strong (2,000 PSIG max). The flexible design will work well with all brands of insertion flow meters.
✦ Overall dimensions: 33.5” x 10.8” x 5.6”
|
Cut Sheets
MAG Meter dimensions/ Installation requirements
12" ANSI Raised Face 150# Flange MAG Meter Cut sheet
8" ANSI Raised Face 150# Flange MAG Meter Cut sheet
6" ANSI Raised Face 150# Flange MAG Meter Cut sheet
4" ANSI Raised Face 600# Flange MAG Meter Cut sheet
4" 304 SS ANSI 150# RFF MAG meter CutSheet
4" TriClover MAG Meter Cut Sheet
3" 304 SS ANSI 150# RFF Remote MAG meter CutSheet
3" 304 SS ANSI 300# RFF MAG meter CutSheet
3" 304 SS ANSI 600# RFF MAG meter CutSheet
4" 304 SS ANSI 150# RFF Remote MAG meter CutSheet
3" ANSI Raised Face 150# Flange MAG Meter Cut sheet
3/4" ANSI Raised Face 150# Flange MAG Meter Cut sheet
1 1/2" TriClover MAG Meter Cut Sheet
1" ANSI Raised Face 150# Flange MAG Meter Cut sheet
2" ANSI Raised Face 150# Flange MAG Meter Cut sheet
2" TriClover MAG Meter Cut Sheet
2" 304 SS ANSI 150# RFF Remote MAG meter CutSheet
Ceramic, Al2O3, Wafer Mount MAG Meter CutSheet
Battery Powered MAG Meter Cut Sheet
Link to Copyrighted 3D STEP Files
Where to get Power Supplies, Gaskets, Nuts and Bolts
MAG Meter Conductivity chart for various fluids
Refer to this chart to ensure your fluid has sufficient conductivity to honor Faraday's Law that is the essence of the MAG Meter.
Theory
MAG Meter Theory and Wiring ![MAG Meter Theory and Wiring]()
As an electrically conductive fluid flow passes through the magnetic field in a MAG meter the electrically charged ions accumulate, with negative ions on one side and positive ions on the other. (Note the MAG meter actually flips the polarity of the magnetic field quickly and the ions move at the speed of light and allow easy measurement) The resulting change in voltage is directly proportional to the velocity of the fluid passing through the inside diameter of the MAG meter. This velocity is used to convert the flow to the flowing volume, usually GPM knowing the measured fluid velocity and the internal pipe diameter.
Insertion MAG meters utilize a small, localized "probe" with magnetic field that is inserted into the pipe. Electrodes cause the positive and negative ions to separate as they do in an inline flow MAG meter. Insertion MAG meters have electrodes located along the probe length to measure average velocity in the measuring location.
Battery Powered MAG Meter Specifications ![Battery Powered MAG Meter Basic Specifications]()
Ideally suited for Irrigation MAG meters and Irrigation Flow Meters as they are battery powered.
4-20 mA Connection to Battery Powered MAG meter
Videos
Style 2 MAG Meter Interface with 4-20 mA Diagnostics and wiring diagram information.
User Password 40000
Battery Powered MAG Meter User instruction video overview:
Battery Powered MAG Meter Cut Sheet
MAG Meter Grounding Ring Sets
Quick video above showing how to use the front panel buttons. The SECRET password to CHANGE variables is 03210 where 00521 is for VIEWING only. To get back to NORMAL operation hold the Enter button (the rightmost button) for 3 to 5 seconds. Password to Configure Calibration is 19818
Video above shows how to set up the Flow Units and Full Scale for those units. Note that this scaling is for driving the 4-20 mA and the frequency output so that the Full Scale value at 20 mA and at full scale Frequency is the number that is set. In this case the 4-20 and the frequency will output 20 mA and 5,000 Hz when the display shows 200 GPM. If the display goes OVER 200 GPM the 4-20 and the Frequency will increase until it "bumps it's head" on the maximum value. If the value on the display is GREATER than the value in Full Scale then one would adjust this value to accommodate the anticipated maximum value.
The video above shows how to set up the meter for Pulse and Frequency and shows how the 4-20 mA is configured. Simulating and validating the 4-20 mA output using the User Interface with 03210 is detailed below. You may ALTER these values (AnalogZero and AnlgRange) using 03210 and they will revert when you exit. Note the 4-20 mA output for this meter is POWERED by the meter. DO NOT connect to a PLC that provides 24 VDC. Connection is made to the 4-20 mA signal using a reading mode just like a Fluke Meter configured to read 4-20 mA DC. The MAG meter provides the 24 VDC for outputting the value to the INPUT of your PLC. Every PLC has the ability to be configured to read this type of 4-20 mA output. (Note: From the main menu the AnalogZero is 49 hits of the UP arrow.) (ADJUSTMENT of the 4-20 Output drive is attained using secret password of 19818 and is risky to use.) If the meter indicates a NEGATIVE flow you may REVERSE the flow using Menu 8: Flow Direction and change it from the indicated value to either the REVERSE or FORWARD value. Note: If the flow indicates a NEGATIVE FLOW number AND you know it is going from LEFT to RIGHT Menu 8 may be used to FLIP the sign. The Flow Direct is a "switch" to take care of the "Right Hand Rule" with regards to the direction of the current vector in Faraday's Law and does not require the direction to agree with the arrow on the meter. If the meter indicates a NEGATIVE flow on the display and does not output 4-20 mA it means that Menu 13: SigmaN Ena can be set to ENABLE to allow the 4-20 to indicate flow in both the + and negative direction. Set Menu 13: SigmaN Ena to DISABLE if you do not want flow to indicate if the flow reverses. In this case the mA will go to 0 mA to indicate reverse flow, but not the magnitude in rate. However, the NEGATIVE Totalizer will account for the negative flow. See video below:
IMPORTANT NOTE: This meter is not a "Loop Powered" device, unlike almost all temperature and pressure transducers that are loop powered. This meter takes 500 mA to run so you can see that they can not be Loop Powered. It is CRITICAL that 24 VDC is NOT connected to the 4-20 mA signal lines of COM and I+ where COM is connected to the "low" side,-, of the 4-20 mA and the I+ is connected to the "high" side,+. Your PLC has a mode in it to read these meters that does NOT involve sending power to the meter. These meters are SOURCING the 24 VDC. Connecting 24 VDC to the Current Output lines may void warranty. The video below shows how to VALIDATE the 4-20 mA signal into your PLC or reading device. Note: If this DOES NOT WORK a likely cause is the power supply does not have enough "power" to provide to the meter. The meter requires a MAX of 500 mA so have a power supply that has the capability to DELIVER 500 mA, even on "start up" where the inrush current given to the electromagnetic coils can rush over 500mA for a few milliseconds.
How to Reset the Totalizer in the MAG Meter. The Password to set the password for the totalizer reset is 10000. We show Clr Sum Key as the 24'th element in the menu structure. The video shows how to set the Totalizer Reset password to 10000.
How to use ModBusPoll on the TacticalFlowMeter MAG meter. Use this to ensure your configuration with your PLC is correct.
If your flow meter is not showing flows at very low flows. You will use this if you notice the flow meter shows 0 flow when you know there is very low flow. The meter ALSO likely has the Response time set at 10 seconds so it suppresses very low flows further. Refer to THIS chart to find the lowest readable flow on YOUR size flow meter .
How to Set the Low Flow Cutoff on the Style 1 MAG meter
How to Set the Low Flow Cutoff on the Style 2 MAG meter
Insertion MAG Meter overview.
View video above to see how an INSERTION MAG meter is installed, which is DIFFERENT than the flange meters on this product page. Please visit INSERTION MAG meter product listing if you discover you need an Insertion Mag Meter. Note: The following display orientations can be ordered so the user does not have to orient in the field.
Learn why Insertion meters only need to be inserted less than 5" in larger pipes by watching the video below....
Discover where the classical "1/8 D Insertion Depth" for location of an insertion meter sensor comes from. We show fluid mechanics data showing WHY the guidance if the pipe Diameter is greater than 10" the insertion depth only needs to be 5"... An Approximation. Above we discuss the EXACT value required to follow "Miller Best Practices".
View video above to see examples of LabVIEW programs we supply to Universities and some customers to assist in getting their projects online.
Video above shows the MAG meter configuration program
What causes a SYS error or SYS alarm on the MAG meter?
SYS means there is a System alarm. The reasons for it may be from the following:
1. No water in the pipe line... or
2. pipe line is not 100% filled with water... or
3. The measuring electrodes are not covered by the water... or
4. The fluid/water is too pure, the conductivity is less than 15 μs/cm... or
5. Water has entered the sensor electronics.
Note: This alarm can be disabled (Menu 24) as there is no harm in running the meter with no fluid. The purpose of the alarm is to "latch" and show itself if any of the above instances may have occurred.